Posts mit dem Label nähen werden angezeigt. Alle Posts anzeigen

Mittwoch, 6. August 2014

Babyquilt mit grau-gelbem Chevron-Muster


Oh weh, ist der letzte Eintrag hier schon wieder lange her! Ich erspare mir jetzt mal lange Erklärungen, warum und wieso, und hoffe einfach mal, dass ihr trotzdem noch ab und zu vorbeischaut und euch über einen neuen Eintrag freut. Und damit komme ich auch schon gleich zur Sache.

Im Rahmen des Memes, in Zuge dessen auch dieses grüne Ofenhandschuhset entstanden ist, habe ich auch einer Freundin etwas versprochen, von der ich wusste, dass sie und ihr Mann gerade versuchten, ihrem kleinen Sohn ein Geschwisterchen zu geben. Natürlich hatte ich da sofort die Idee, dass etwas für das Baby schön wäre! Zum Glück kam bald darauf auch die Nachricht, dass es mit dem Nachwuchs geklappt hat ;).

Ich wusste auch gleich, dass ich unbedingt eine Patchwork-Decke nähen will. Ich liebe Patchwork (wie man daran merkt, dass ich nur selten dem Drang widerstehen kann, auch kleinere Dinge zu patchen), und ich wollte schon seit Ewigkeiten mal wieder eine ganze Decke machen. Eine Babydecke schien da das ideale Projekt, zumal ich mich auch am Maschinenquilten versuchen wollte. Meine alte Tagesdecke habe ich damals vor Urzeiten stümperhaft von Hand gequiltet ...

Oh my, it's been ages again since my last post! I'll spare you long explanations as to why and how and just hope that you're visiting here from time to time nevertheless and are happy to see a new post. So let's get back to business!

In the course of the meme in which I also made this green potholder set, I also promised something to another friend who was trying to give her small son a sibling as I knew. So I immediately thought something for the baby would be nice! Fortunately, soon after we got the news that operation 'bun in the oven' was a success ;).

I also knew that I wanted to do a baby quilt right away. I love patchwork (as you can see from the fact that I rarely manage to withstand the urge to piece smaller projects, too), and I had wanted to do a quilt again for ages. A baby quilt seemed to be the ideal project for that, especially since I wanted to try my hand at machine quilting. My old bedspread I had quilted by hand in the most amateurish way possible, ages ago ...


Für Gelb und Grau als Farbschema entschied ich mich, weil zu Beginn ja noch nicht klar war, ob es Mädchen oder Junge wird, daher wollte ich eine der typischen Babyfarben vermeiden. Und die Kombination Gelb-Grau finde ich selbst echt schön. (Außerdem finde ich dieses Mädchen-Pink, Jungen-Blau ohnehin doof.) Es wurde übrigens ein Junge, und die Mama versicherte mir, dass die Farben super in das Kinderzimmer passen würden. Und Chevrons wurden es, weil Chevrons einfach schön sind und auch einfach zu patchen sind. Beim ersten Mal nach langer Zeit soll man sich ja nicht gleich überfordern.

I chose yellow and gray as the colours because at the beginning, it wasn't sure whether it would be a boy or a girl, so I wanted to avoid the typical baby colours. And I really love the combination of yellow and gray. (Also, I really hate the 'pink for girls, blue for boys' rule.) It's a boy, by the way, and his mother assured me that the colours are fitting his nursery perfectly. I chose chevrons because chevrons are lovely and not too hard to piece. It was the first time after a long time, so I didn't want to choose something too challenging.


Die Rückseite besteht ganz einfach aus einem kuscheligen Fleece, und da ich wollte, dass die Decke schön weich und anschmiegsam wird, habe ich das Quilting sehr einfach gehalten und nur die Chevrons entlang im Nahtschatten gequiltet. (Dabei ist übrigens die eine Hälfte deutlich hübscher geworden, da ich etwa nach der Hälfte ein nützliches Tool bekam, das dabei sehr hilft: Einen Kantennähfuß. Das Teil ist eine meiner besten Anschaffungen seit langem!)

The back is simply a cuddly fleece, and since I wanted that the quilt remained soft and supple, I kept the quilting very simple and only stichted along the chevrons in the ditch. (One half is way more pretty than the other since halfway through I got a new tool that really helps with it: An edge foot. That's one of my best buys in a while!)


Die Decke misst insgesamt 80 x 110 cm und besteht aus elf verschiedenen gelben und grauen Stoffen. Mittlerweile befindet sie sich seit einiger Zeit bei ihren neuen Besitzern, und ich hoffe, Baby J. wird lange viel Freude daran haben! (Nun ja, im Moment haben wahrscheinlich seine Eltern und die Leute drumherum noch mehr Freude daran.) Ich bin sehr stolz auf das Endergebnis, das ist eines meiner absoluten Lieblingsprojekte der letzten Jahre. Fast würde ich mir wünschen, dass noch ein paar Leute in unserem Bekanntenkreis Kinder kriegen würden, nur, damit ich einen Anlass hätte, noch mehr solche Decken zu nähen ;)!

Was verschenkt ihr so am liebsten an neugeborene Babys? Habt ihr schon mal einen Babyquilt genäht?

Overall, the quilt has a size of 80 x 110 cm and consists of eleven different yellow and grey fabrics. By now it's been with its new owners for a while, and I hope baby J. will enjoy it for a long time to come! (Well, right now his parents and the people around him are enjoying it more, I suppose.) I'm very proud of it, it's one of my absolute favourite projects to date. I almost wish some more people in my circle of friends would have children just so I have an excuse to sew more quilts like this!


What's your favourite gift for a new baby? Did you ever sew a baby quilt?

Da dies eindeutig mein Lieblingsprojekt von 2014 ist, verlinke ich es bei Pattydos Neujahr-Blogparade.

Montag, 19. Mai 2014

Blaues Granny Square-Kissen


Ach du je, habe ich meinen Blog aber vernachlässigt! Über einen Monat ist der letzte Beitrag her ... Es gab nicht mal einen richtigen Grund dafür, nur eine Kombination aus Zeitmangel und Unlust, und irgendwie war selbst dann, wenn ich Zeit hatte, irgend was anderes immer wichtiger. Aber jetzt habe ich beschlossen, dass es so nicht weitergehen kann. Und somit melde ich mich mal zurück.

In der Zwischenzeit hat sich natürlich auch einiges zum Zeigen angesammelt, aber das meiste schlummert noch auf meiner Kamera vor sich hin und wartet darauf, bearbeitet zu werden. Also fange ich mal mit einem Stück an, das schon ein Weilchen länger darauf wartet, hier auf dem Blog landen zu dürfen: Mein zweites Granny Square-Kissen.

Oh my, I've really neglected my poor blog terribly! The last entry was over a month ago ... There even wasn't a real reason, only a combination of little time and no energy, and even when I had time, there was always something more important to do. But now I decided that it can't go on like this any longer. And so I'm back!

In the meantime, of course a lot has accumulated that I want to show but most of it is still biding its time in my camera, waiting to be edited. So I'll start with something that has been waiting to end up on the blog for quite some time: My second granny square cushion.


Während das erste ja sehr bunt war, kommt das zweite etwas reduzierter und Ton in Ton daher, in einer meiner Lieblingsfarben. Jahrelang waren die meisten meiner Kleidungsstücke in allen möglichen Blautönen, und erst in letzter Zeit hat sich das davon etwas wegbewegt, zu mehr Rot, Grün und Gelb. Trotzdem wird Blau wohl immer eine der Farben bleiben, die einfach immer gehen, schon, weil sie in meinen Augen besser kombinierbar ist als zum Beispiel knalliges Rot oder Gelb.

While the first was very colourful, this one is a bit simpler and keeping to one colour mostly, in one of my favourite colours. For many years, most of my clothes were in lots of shades of blue, and only lately I've been drifting more towards red, green and yellow. Nevertheless, I think blue will always remain one of the colours I'll always like, if only because I find it easier to combine than a bright red or yellow, for example.


Auf der Rückseite habe ich mir mal wieder etwas Patchwork nicht nehmen lassen, diesmal ein großes Pinwheel aus zwei verschiedenen Stöffchen mit Weiß. Verschlossen wird das Kissen auch wieder mit einer Knopfleiste, die in den Rand der Grannys einhakt.

Leider habe ich beim Nähen der Hülle etwas übersehen, dass das Inlet für mein erstes Kissen ein altes, schon sehr plattgesessenes Teil war - für dieses habe ich nun ein ganz nagelneues Inlet erworben, und prompt ist die Hülle jetzt sehr straff. Passt aber noch, und solange die Knöpfe halten, ist alles okay :-).

On the back I couldn't help it but do some piecing, this time a huge pinwheel made of two different fabrics and a white solid. The cushion is again closed with a row of buttons hooking into the edge of the granny squares.

Unfortunately I've used the first cushion as a model when sewing the sleeve and forgot that the inlet is a very old one that's rather deflated - for this one I bought a brand new one, so the sleeve is now very well stuffed. But it still fits, and as long as the buttons aren't torn off, everything's fine :).


Um das Vorderteil auf die richtige Größe zu bringen, habe ich es noch mit ein paar zusätzlichen Reihen umhäkelt. Das einzige, was mich ein bisschen ärgert, ist, dass ich die Eck-Grannys nicht über Kreuz gesetzt habe, sondern je eine Farbe auf einer Seite habe. Aber das ist nur ein Detail, das wahrscheinlich eh niemand außer mir bemerkt. Im Großen und Ganzen finde ich das Kissen echt schön. Und so langsam wird mein Bett richtig kuschlig :-). Oder na ja, wäre es, wenn das Kissen nicht mittlerweile ins Wohnzimmer gewandert wäre und dort als Sitzkissen missbraucht würde. Als eines der nächsten Projekte steht darum ein "richtiges" Sitzkissen auf dem Plan! Das allerdings wahrscheinlich nicht mit Granny Squares :-) ...

Habt ihr eure Kissen lieber ganz bunt oder eher schlicht? Ich mag ja beides gern und kann mich nicht entscheiden, welches mir besser gefällt!

To get the granny squares to the right size, I crocheted a few additional rows around it. The only thing I could have done better is that the corner granny squares are not diagonal but one colour on each side. But that's only a detail no one but me probably would notice. Overall the cushion turned out quite pretty. And my bed is becoming really cozy :-). Or it would be if the cushion hadn't wandered to the living room by now where it's being used in lieu of a pouf. So one of the next projects will be a "real" pouf! That won't be made up of granny squares, though :-) ...

Do you prefer your cushions to be very colourful or rather understated? I love both and really can't decide which of the cushions I like best!

Sonntag, 6. April 2014

Täschchen in allen Formen und Farben


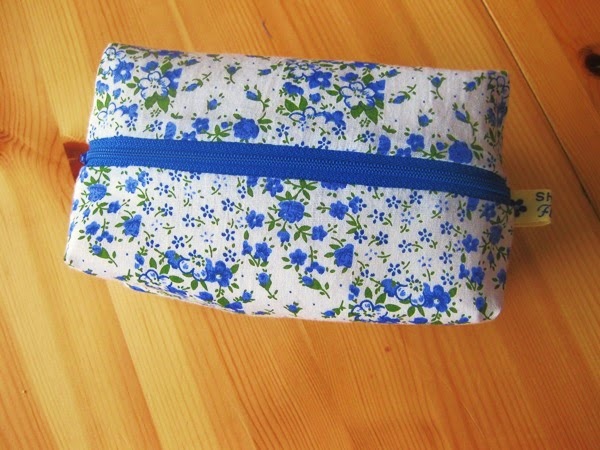
Heute zeige ich euch mal wieder etwas Genähtes! Mit diesen Täschchen habe ich die erste Schritte auf meiner neuen Nähmaschine gewagt. Solche Täschchen sind recht schnell und einfach genäht, und man kann nie genug davon haben, oder? Auch wenn ich darin viele meiner Stifte unterbringen konnte, fehlt mir beispielsweise immer noch das ideale Täschchen in der richtigen Größe, das meine Buntstifte nicht zum Platzen bringen ;).

Time for some sewing again! These pouches were what I made when taking the first steps on my new sewing machines. They are fast and easy to sew, and you never can have enough of them, don't you think? Even if I could get most of my pencils and pens into these, I still don't have the perfect pouch in just the right size my colour pencils do not make explode ;).


An dieser mag ich den blauen Reißverschluss sehr gern! Im englischsprachigen Raum nennt man diese Form boxy pouches - dadurch, dass der Reißverschluss nicht nur auf der Oberseite verläuft, sondern noch ein Stück an der Seite, ist sie besonders geräumig.

I especially like the blue zipper in this one! Those pouches are usually called boxy pouches - that the zipper not only runs over the upper side but also down the sides a bit, they are especially roomy.


Dieses Täschchen entstand mal wieder durch einen Fehler meinerseits - ich sollte mir vielleicht abgewöhnen, beim Zuschneiden immer zu improvisieren, aber solange ich aus den Fehlern immer noch was Nettes machen kann ... Ich hatte eigentlich eine boxy pouch wie die blaue oben zuschneiden wollen, aber mal wieder was verdreht. Aber den bereits zugeschnittenen Stoff wegschmeißen? Niemals! Und so wurde leicht abgewandelt doch noch ein Täschchen daraus, halt sehr flach und breit. Aber das ungewöhnliche Format hat auch etwas ...

This pouch was, once again, the result of me making a mistake - I should probably stop improvising when cutting but as long as I can turn my mistakes into something nice ... This was supposed to be a boxy pouch like the one above it but I mixed up something again. But throwing away my cuts? Never! And so it still became a pouch with slight alterations, just a very flat and wide one. But the unusual shape has a certain flair, too.


Den Schnitt für dieses dreieckige Mäppchen habe ich schon vor ein paar Jahren selbst entwickelt, ausnahmsweise nicht aus Versehen XD ... Ich finde es eine hübsche Form, schlicht, aber etwas "anders". Dazu wollte ich gern mal ein Tutorial schreiben. Fragt sich nur, ob ich in diesem Leben noch dazu komme ^^ ...

Gefüttert sind alle drei Täschchen mit H200-Bügeleinlage und einem Futter aus meinem geliebten Nesselstoff. So bunt, wie sie außen sind, müssen sie innen nicht auch noch knallig sein, finde ich.

The design of this triangle pouch was one I had made myself a few years ago, for once not by accident XD ... I think it's a nice shape, simple but still a bit "different". I wanted to write a tutorial for a pouch like this one day. We'll see if I manage to do so in this life ^^ ...

All three pouches are lined with H200 interfacing and my beloved nettle cloth. As they're colourful on the outside, they didn't have to be quite as bright on the inside, I thought.

Mögt ihr auch gern so kleine, schnelle Kreationen, oder doch lieber Kleider und Großprojekte?

Do you also like doing such small, quick projects, or are you more the dressmaking type?

Mittwoch, 12. März 2014

[Me Made Mittwoch] Paperbag Waist Skirt


Heute geselle ich mich zum allerersten Mal zu den gutgekleideten Frauen beim Me Made Mittwoch und zeige euch meinen neuesten Rock. Genäht habe ich den Paperbag Waist Skirt - so genannt nach den "verknautschten" Falten am oberen Ende, eben, wie man eine Papiertüte zusammenknüllt - nach einem Tutorial von Laura. Schon als ich ihren fröhlich bunten Rock das erste Mal sah, wollte ich ihn gern nachmachen.

Today I'm joining the well-dressed girls at the Me Made Mittwoch blog for the very first time and showing you my newest skirt. I made the paperbag waist skirt - the name refers to the way the waist is shaped like a paperbag when you scrunch it up - following a tutorial by Laura. When I first saw her pretty colourful skirt, I immediately knew I had to make my own version.


Da ich nicht so einen praktisch für das Schnittmuster passenden Stoff hatte wie Laura, habe ich als kleine Änderung meinen Rock aus mehreren Bahnen aus zwei verschiedenen Stoffen zusammengesetzt. Zugegebenermaßen hatte ich eigentlich vor, den karierten Stoff fröhlich aus den Kellerfalten hervorblitzen zu lassen ... Aber irgendwie habe ich es beim Aufschreiben und Ausrechnen der Teile verwechselt und es erst am Ende gemerkt, als schon alles zugeschnitten war - und den Stoff deswegen verschwenden? Nix da! Und ich finde die Kombination auch so recht schön.

Der naturfarbene Stoff ist mein heißgeliebter ungefärbter, ungebleichter Baumwoll-Nessel - ich liebe die natürliche Farbe und die leicht gröbere Struktur und kombiniere ihn sehr gern mit kräftig gemusterten Stoffen. Der blaue Karo-Stoff war ein Schnäppchen aus dem Stoffladen, und ich weiß nicht genau, was für ein Stoff es ist. Angesichts der rotblauen Schmauchspur, die er auf meinem Bügeleisen hinterlassen hat, scheinen für ihn einige Polytierchen gestorben zu sein ... Er ist jedenfalls leicht stretchig und daher beim Zuschneiden recht zickig, beim Verarbeiten aber dank des geradlinigen Musters sehr dankbar. Ich bin sehr stolz darauf, wie schön das Muster (fast) überall aufeinander trifft!

Since I did not have a fabric matching the pattern so neatly like Laura's did, I made the small change of constructing my skirt from several strips of two different fabrics. I have to admit that I originally had wanted the checked fabric to be in the boxed pleats ... But somehow I messed things up when writing down and calculating the pattern and only noticed when I had everything cut and ready - and throw out the fabric, just because of that? Never! And I think the combination is quite nice like this, too.

The undyed fabric is my beloved nettle cloth - I love the natural colour and the slightly coarse weave and like to combine it with heavily patterned fabrics. The blue checkered fabric was a bargain buy at the fabric store, and I don't remember what kind it was. Seeing the red-blue streak it left on my iron, it seems to be some polyester deal ... In any case, it is slightly stretchy and therefore a nightmare to cut but really good to work with when sewing, thanks to the straight lines of the pattern. I'm very proud of how well the pattern matches (almost) everywhere! 


Das Nähen nach Lauras Tutorial war größtenteils überhaupt kein Problem - ins Schleudern bin ich nur gekommen, als es darum ging, das Gummiband festzunähen. Laura schreibt da, man sollte den Stoff möglichst faltenfrei auf das Band nähen. Wie soll das gehen, wenn der Stoff nun mal schnittbedingt in Tausend Fältchen liegt? Das ist doch die Natur einer Raffung ... Egal, meiner liegt jetzt halt in Falten und ist auch so festgenäht. Das Einziehen des Gummibands hat mich übrigens auch Nerven gekostet, und am Ende habe ich den Tunnel einfach auf drei Zentimeter (statt wie vorgesehen zwei Zentimeter) erweitert. Aber die Konstruktion der Kellerfalten und der ganze Rest war alles kein Problem, es ist ein einfacher und gut erklärter Schnitt.

Ich muss gestehen, ich bin mir aber noch nicht sicher, ob mir der Rock an mir gut gefällt. Meine Problemzone ist nun mal der Bauch, und die Paperbag Waist betont den doch ziemlich ... Und irgendwie wirkte der Rock vor dem Spiegel nicht ganz so kurz wie hier auf den Fotos. Nun ja, ich habe kein Problem mit kurzen Röcken, es überrascht mich nur etwas! Ich denke, ich werde ihn gern tragen, aber ein Wiederholungstäter wird der Schnitt nicht werden.

Und ich merke, ich brauche dringend mehr Oberteile, vor allem einfarbige! Das T-Shirt hier ist das einzige, das gut mit diesem Rock kombinierbar ist ... Zu schade, dass ich viel lieber Röcke als Oberteile nähe!

Following Laura's tutorial was no problem overall - I just did some stumbling when I arrived at sewing down the elastic waist band. Laura has written that the fabric should have as little pleats as possible when sewing it down. How's that supposed to work when the fabric is pleated like whoa because the waistband is of course much shorter than the fabric? That's how a gather is supposed to work, I thought ... Well, anyway, mine is sewed down with a lot of pleats now. Inserting the elastic also really took a toll on my nerves, too, and I finally simply enlarged the tunnel to three centimetres (instead of two). But constructing the boxed pleats and the rest was a breeze, it's a simple and well-explained pattern.

I have to admit I'm not sure that I really like myself in the skirt, though. My problem area just is my belly, and the paperbag waist emphasizes it a bit ... And somehow the skirt didn't look as short in the mirror as it does in these pictures. Well, I don't mind short skirts, I'm just a bit surprised, is all! I think I will wear it and like it but the pattern won't become a repeat offender.

And I notice I urgently need more tops and shirts, especially without patterns/prints! This shirt is the only one that can be combined with this skirt so far ... Too bad that I prefer sewing skirts over shirts!


Mit diesem Foto, bei dem man schön sieht, dass ich als Model noch viel lernen muss, verabschiede ich mich jetzt und schaue mal, was die anderen beim Me Made Mittwoch heute so tragen!

And leaving you with a last picture that really shows that I have a lot to learn as a model, I'm now going to see what everyone else is wearing at the Me Made Mittwoch blog today!

Donnerstag, 6. März 2014

Gegen verbrannte Finger: Ofenhandschuhe und Topflappen


Diese Sets aus Ofenhandschuhe und Topflappen waren Geschenke - das linke Set bekam eine gute Freundin zu Weihnachten (ja, immer noch Weihnachtsgeschenke! Das ist jetzt aber auch das letzte ;).), das rechte Set bekam eine Freundin im Zuge eines Memes. Kennt ihr das? Da postet man auf seinem Blog (nicht auf diesem hier, das war ein anderer), dass man fünf Leuten, die kommentieren, innerhalb eines Jahres etwas Persönliches, Selbstgemachtes schenkt. Diese wiederum posten das ebenfalls in ihrem Blog, also hat man im Gegenzug auch die Gelegenheit, ein paar selbstgemachte Geschenke abzustauben. Ich muss ja gestehen, dass das Jahr mittlerweile rum ist und dieses Geschenk das einzige ist, das ich in dieser Zeit fertig bekommen habe *hust*. Allerdings habe ich von den anderen, bei denen ich mich gemeldet habe, auch nichts bekommen, ich bin also nicht die einzige Schnarchnase :).

These sets of pot holders and oven gloves were presents - the left set was for a good friend for Christmas (yes, that's still a Christmas present in March! But this is the last one, I promise ;)), the right one was for another friend in the course of a meme. Do you know those memes? You post on your blog (which wasn't this one but a different one) that the first five people to comment will get a hand-made present made just for them within one year. The people commenting then have to post it on their blog so that you also get the chance to get some hand-made presents. I have to admit that the year is over by now and this present is the only one I finished in that time *cough*. On the other hand, I didn't get anything from the people where I commented, so I'm not the only slacker, at least ;).


Aus den selben Stoffen habe ich C., für dieses Set war, vor einigen Jahren mal eine Handtasche genäht. Sollte sie also das Bedürfnis haben, beim Kochen oder Backen eine Handtasche dabei zu haben, ist jetzt also sichergestellt, dass alle Accessoires perfekt aufeinander abgestimmt sind :).

Leider habe ich jetzt kaum noch was von den Stoffen übrig, sonst hätte ich ihr womöglich noch eine passende Schürze dazu genäht. Oder vielleicht auch nicht, ich saß nämlich auch so den Tag vor Weihnachten nur an der Nähmaschine. Aber ich finde, es hat sich gelohnt. Bei diesem Set bin ich sehr stolz auf die saubere Stepp-Arbeit, ich habe mir wirklich viel Mühe gegeben!

I once made a handbag for C. who received this set using the same fabrics. So if she feels like wearing a handbag while cooking or baking, her accessoires will be perfectly matched now ;).

Unfortunately I now have almost used up the fabrics, otherwise I might have also sewn a matching apron for her. Or maybe not, as I was sewing all day the day before Christmas Eve. But I think it was worth it. With this set, I'm very proud of the clean stitching, I really put a lot of effort in it!


S. arbeitet seit einiger Zeit in einem Bioladen und backt dafür auch vegane Kuchen, daher fand ich, dass sie einen schönen Ofenhandschuh und Topflappen sicher gebrauchen kann! Dazu passte ideal das Paprika-Schrägband, das ich letztes Jahr auf dem holländischen Stoffmarkt in Ludwigsburg gekauft hatte. Und grün musste das Set einfach sein, da Grün ihre Lieblingsfarbe ist. Nur das mit der "Tasche" auf der Rückseite des Topflappens hat nicht ganz so hingehauen, wie ich mir das vorgestellt habe ...

Übrigens bekam sie dazu, um das Ganze thematisch abzurunden, die veganen Kirsch-Brownies, die ich euch hier schon vorgestellt habe :).

S. has been working in a wholefood shop for a while now and also bakes vegan cakes for it, so I thought she would surely appreciate having a pretty oven glove and potholder! The bell pepper bias tape I bought last year on the Holland fabric market in Ludwigsburg was perfect for that. And the set just had to be green since that's her favourite colour. Only the "pocket" on the back of the potholder did not turn out quite the way I had imagined it ...

And to round it off thematically, she also got the vegan cherry brownies I've shown you here :).


Ich finde, Ofenhandschuhe und Topflappen sind tolle Geschenke, zum Beispiel auch als Housewarming Gift nach einem Umzug - sie sind schnell gemacht, wenn man einmal den Dreh raus hat, und sie bieten viele Gestaltungsmöglichkeiten. Ich habe da auch noch die eine oder andere Idee, mal sehen, ob ich die nicht mal umsetze ... Auch wenn ich gestehen muss, dass hier eigentlich keine große Topflappenknappheit herrscht ;).

I think oven gloves and potholders are great presents, for example also as a housewarming gift after a move - once you've found your groove, they are easy and fast to make, and they offer a lot of design choices. I still have a few ideas, we'll see if I realise some of them soon ... Even if I have to admit that we're not really suffering from a shortage of potholders here ;).

Donnerstag, 16. Januar 2014

Geschenke aus meiner Nähstube


An Weihnachten habe ich natürlich nicht nur die Knabbereien verschenkt, die ich euch im letzten Eintrag gezeigt habe, sondern auch einiges Selbstgenähtes und -gebasteltes - ich saß noch am Tag vor Heiligabend bis abends an der Nähmaschine! Zum Glück ist noch alles rechtzeitig fertig geworden. Heute zeige ich euch einen Teil davon - den Rest nicht, weil der thematisch irgendwie nicht so dazu passt, der kommt ein anderes Mal. Macht keinen Sinn? Macht nix. Muss nicht immer alles Sinn machen, was ich hier mache :).

For Christmas, I didn't only have the snacks I showed you in my last entry for presents, of course, but also some things sewn and made by me - I was sitting at my sewing machine until the evening before Christmas Eve! So happy that I could finish everything in time. Today I'm showing you the first part of those things - the rest will be posted another time since it doesn't fit thematically. That doesn't make sense? Too bad, but not everything I'm doing on here has to make sense :).


Hier seht ihr einen weiteren Eintrag in der Reihe "Meine Familie bringt mich dazu, die seltsamsten Sachen zu nähen". Es handelt sich um Gewichtmanschetten, die ich für meinen Vater genäht habe.

Mein Papa hat nämlich seit einiger Zeit große Probleme mit Hüfte und Knien - nun, er wird ja auch nicht jünger! Nächstes Jahr wird er siebzig ... Deswegen (also wegen den Hüftproblemen, nicht, weil er bald siebzig wird) hat er Krankengymnastik bekommen und dort auch Übungen gezeigt bekommen, die er zuhause machen soll. Und damit das auch was bringt, braucht man zusätzliche Gewichte.

Und wieso soll man sowas im Laden kaufen, wenn das die Tochter sicher auch nähen kann? So kam es, dass ich den Auftrag bekam, ihm Gewichtsmanschetten zu nähen. Das hat mich mal wieder einige Versuche gekostet, bis die Länge und die Biegsamkeit der gefüllten Manschetten hinkamen!

Gefüllt sind sie mit Vogelsand und werden mit Klettverschlüssen geschlossen. Sie wiegen je ein halbes Kilo. Der Stoff ist ein furchtbar abfärbender robuster Stoff unbestimmter Art, vermutlich Baumwolle. Insgesamt fallen sie wohl unter "nicht schön, aber praktisch" - das sollte aber für den Zweck sicher ausreichen, Schönheit wäre da eher fehl am Platz ;).

And here's another entry in the series "My family makes me sew the weirdest things". Those are weights I made for my father.

My dad has been suffering from severe pain in the hips and knees for a while now - well, he isn't getting any younger! Next year will be his seventieth birthday ... That's why he got physical therapy (because of the hip problems, not because he's almost seventy), and they also showed him some exercise to make at home. For those to be really effective, you need weights like this.

And why buy them in a shop when you have a daughter who can surely sew them? So I got commissioned to sew him weights. I need some tries again until the length and flexibility of the filled cuffs was right!

They are filled with bird sand and have velcro closures. Each is half a kilogram. The fabric is a robust but terribly bleeding fabric of unknown type, presumably cotton. All in all they are more of a "not pretty but handy" kind - but for their purpose, that might be the right thing, looking for prettiness might be a bit misplaced here ;).


Meine Mama bekam auch etwas zur Pflege ihrer Gelenke (ja, auch sie ist nicht mehr die Jüngste ...) - diese Kissen sind mit Rapssamen gefüllt. Sie lassen sich wie Kirschkernkissen oder Dinkelkissen im Backofen erwärmen, man kann mit ihnen aber auch kalt gut etwas Fingergymnastik machen. Die kleinen Kissen sind etwa handtellergroß, also ideal dazu, sie in der Hand zu halten und damit herumzuspielen. Das große ist etwa DIN A 5-groß, also eine gute Größe für den Rücken oder den Bauch.

My mom also got something for her joints (yes, she is also getting along a bit ...) - these pads are filled with rape seed. They can be heated in the oven like cherry pit or spelt pads but you can also use them to exercise your fingers when they are cold. The small pads are about the size of my palm, so they're the perfect size to hold them in your hand and play with them. The big one is about 10 x 20 cm, so it's a good size to put on your belly or back.

Ich kann nur sagen, zum Glück hat meine Nähmaschine noch durchgehalten, als ich an diesen Geschenken gearbeitet habe! Als ich letzte Woche nämlich wieder etwas nähen wollte, endete das mit Frust ... Und so muss ich wohl einsehen, dass nach etwa fünfzehn Jahren die Zeit meiner guten alten Brother gekommen ist. Ich hatte sie letztes Jahr schon einmal reparieren lassen, das hat aber nur eine kurze Zeit Ruhe erbracht. Sie jetzt noch mal wegzubringen, nur, um in ein, zwei Monaten wieder die gleichen Probleme zu haben ... Nein, darauf hatte ich keine Lust. Und so habe ich mir am Samstag ein paar Maschinen angeschaut und inzwischen eine neue bestellt. Jetzt warte ich ungeduldig auf den Anruf, dass mein neues Schätzchen angekommen ist, hach, ich freu mich schon so! Dann kann es bald wieder losgehen, ich habe dieses Jahr nämlich einiges vor!

Wenn ihr auch näht, erzählt doch mal, welche Maschine ihr verwendet? Auch wenn meine Entscheidung schon gefällt ist, bin ich neugierig ;).

I can only say, I'm lucky that my sewing machine still pulled through when I worked on these presents! Because when I wanted to sew something again last machine, I gave up in frustration at the end ... And so I have to face the fact that my dear trusty Brother machine has seen its best years after fifteen years, and it is time for a new one. I had it repaired last year but that only helped for a short time. I don't really feel like having it repaired again now, only to have the same problems in a month or two ... And so I looked at some sewing machines on Saturday and have ordered a new one now. I'm waiting inpatiently for the call that it has arrived, oh, I can't wait! Then I can start again, because I have quite some things I want to do this year!

If you are sewing, too, tell me what machine you're using?! Even though I already decided, I'm always curious ;).

Montag, 21. Oktober 2013

[Stich an Stich] Umhängetasche Emily

Vor kurzem hatte ich eine ganz besondere Chance - Julia von Kreativlabor Berlin suchte Probenäher für ihr neues E-Book, die Umhängetasche Emily. Das war mein erstes Mal als Probenäherin (eigentlich hatte ich mich für ein anderes ihrer E-Books beworben, die Ballerinas, aber da wurde ich leider nicht genommen), und ich habe mich sehr darüber gefreut! Es ist sehr spannend, so ein Schnittmuster zum ersten Mal auszuprobieren.

Some time age, I got a very special chance - Julia of Kreativlabor Berlin was looking for pattern testers for her new e-book, the shoulder bag Emily. That was my first time as a pattern tester (originally I had applied to be a tester for another one of her e-books, the pumps, but I wasn't chosen for them, sadly), and I was very happy! It's very exciting to try out such a pattern for the first time.


Heraus kam diese hübsche Umhängetasche - ich habe mich für die größere Variante entschieden, die als kleine Sporttasche oder für eine Nacht bei Freunden oder meinen Eltern genau die richtige Größe hat. Wie gefällt euch die Farbkombination? Ich mag derzeit leuchtendes Gelb so gern <3! Und das Blau dazu finde ich einen schönen Kontrast.

And this is what I made: This pretty shoulder bag. I chose the bigger size which is just right as a small sports bag or for staying over at friends or my parents. How do you like the colour combination? I'm currently so in love with bright yellow <3! And I think the blue is a nice contrast.


Mein Zeitplan für die Tasche war mal wieder sehr eng ... Am Freitag habe ich die Stoffe gekauft, den Großteil des Samstags mit Nähen verbracht und am Sonntag Fotos gemacht, bearbeitet und das Feedback eingeschickt. War ich froh, dass das alles reibungslos geklappt hat! Um die Stoffe zu waschen, blieb leider keine Zeit, also muss ich hoffen, dass sie nicht einläuft, wenn ich sie mal waschen muss. Aber das Risiko nimmt man halt in Kauf, wenn man zu so wenig kommt wie ich manchmal ^^.

My schedule for the bag was rather tight again ... I bought the fabric and notions on Friday, spent most of Saturday sewing and took pictures, edited them and sent the feedback in on Sunday. I was so happy that everything went smoothly! There was no time to wash the fabric, unfortunately, so I have to hope it won't shring if I have to wash it someday. But that's a risk you take when you're as busy as I am ^^.


Das E-Book ist wirklich gut geschrieben und leicht umzusetzen - das Einzige, wobei ich etwas Schwierigkeiten hatte, war das Wenden (ich empfehle, die Wendeöffnung größer zu machen als die 10 cm, die in der Anleitung stehen), da der mit Vlies verstärkte Stoff doch recht steif und widerspenstig ist. Es hat mir großen Spaß gemacht, die Tasche zu nähen. Und ich habe mich besonders gefreut, dass Julia meine Bilder so mochte, dass sie eines davon in ihrem Blogeintrag zu dem E-Book besonders herausgestellt hat!

Bei der nächsten Chance zum Probenähen bin ich bestimmt wieder dabei :)!

Hattet ihr auch schon mal die Chance, probezunähen? Und wie gefällt euch die Tasche?

The e-book is really well written and easy to follow - the only thing I struggled with was turning the bag (I recommend making the opening for turning bigger than the 10 cm the pattern recommends) since the interfaced fabric is pretty stiff and hard to handle. I really enjoyed making the bag. And in particular I was happy that Julia liked my pictures so well that she highlighted one of them in her blog post about the e-book!

I'll certainly jump at the next possibility to patterntest :)!

Did you have the oportunity to be a patterntester, too? And how do you like my bag?

Montag, 7. Oktober 2013

[Stich an Stich] Bücherhüllen


Wie ich in dem Beitrag über das Mülltüten-Huhn schon erwähnte, bekam mein Bruder zum Geburtstag natürlich auch etwas Selbstgenähtes. Und genau wie bei dem Huhn musste ich anhand eines Fotos im Internet selber herausfinden, wie das funktionieren sollte ... Das war hier allerdings etwas einfacher.

Da mein Bruder sich gerade mit Theologie beschäftigt (fragt mich nicht, was genau er da macht, ein Studium oder eine Ausbildung ... Irgendwas halt mit seiner Gemeinde), trägt er ziemlich viele Bücher mit sich herum, wenn er zur Arbeit fährt, um in der Bahn lesen zu können. Das kann sie natürlich auf Dauer etwas in Mitleidenschaft ziehen, und so hat er sich Schutzhüllen dafür gewünscht.

As I already mentioned in my post about the garbage bag chicken, my brother got something self-made for his birthday, too, of course. And just like with the chicken, I had to find out myself how to do it just withe the help of a picture on the internet ... In this instance, however, that was much easier.

Since my brother is studying theology right now (don't ask me what exactly he's doing, I just know it's something to do with his parish), he is always carrying around quite a lot of books on his way to work so he can read on the train. Of course that causes quite a bit of wear and tear, and so he asked for some protective sleeves for them.


Meine Interpretation davon seht ihr hier: Vier Schutzhüllen in zwei Größen und zwei Farben, mit einem Bindeband zum Verschließen. Außen sind die Hüllen aus stabiler, einfarbiger Baumwolle, und ein bunter Druck als Futter und Bindeband verleiht ihnen etwas Pfiff.

Here you can see what I came up with: Four sleeves in two sizes and two colours, with a ribbon to tie them shut. The outside is made of robust cotton solids, and a colourful print for the lining and the ribbon makes them a bit more interesting.


Das Schnittmuster kann vielleicht noch etwas Perfektion vertragen, sie gefallen mir aber eigentlich sehr gut - vielleicht sollte ich mir auch ein paar davon nähen, meine Bücher müssen ab und zu auch ziemlich darunter leiden, von mir mitgeschleppt zu werden. Und sie sind schnell genäht - vielleicht eine gute Idee als Mitbringsel oder kleine Aufmerksamkeit für einen Bücherwurm?

The pattern may require a bit more work but I actually really like them - perhaps I should make a few of them for myself, my books happen to suffer a bit from being dragged around by me sometimes, too. And they're fast to make - perhaps a good idea as a small present for a book-lover?


Wie schützt ihr eure Bücher, wenn ihr unterwegs seid? Wären solche Bücherhüllen auch etwas für euch?

How do you protect your books when you're travelling? Would such book sleeves be a good idea for you, too?

Sonntag, 22. September 2013

[Stich an Stich] Mülltüten-Huhn


In meiner Familie bin ich so ziemlich die einzige Kreative, zumindest, was Handarbeiten angeht. Meine Mutter hat zwar früher gewebt (über meinem Bett hängt noch immer der Wandbehang mit der Regenbogenschnecke, den sie für mich gemacht hat) und ziemlich viel ausprobiert, aber heute macht sie das kaum mehr, und der Rest meiner Familie noch weniger. Das hat zur Folge, dass sie mit Ideen für Handarbeiten immer auf mich zukommen, meistens anlässlich von Geburtstags- und Weihnachtsgeschenken. Mir macht das nichts, da ich wahnsinnig gern anderen etwas Selbstgemachtes schenke. Aber manchmal führt das zu seltsamen Herausforderungen ...

So auch hier. Was meint ihr, was das ist? Nein, das ist nicht nur ein Deko-Stück. Das ist ein Mülltüten-Huhn.

Ein was?

Ein Mülltüten-Huhn. Ja, wirklich.

Meine Mutter hatte das in einem Geschäft gesehen und fand es witzig, dachte aber: "Das kann man bestimmt auch selber machen." "Man" war in dem Fall natürlich ich :). Somit bekam ich den Auftrag für ihren Geburtstag und als Info einen Link zu einer Webseite mit einem Bild.

In my family, I'm actually the only one who's a crafter - my mother used to weave (I still have a wall hanging of a colourful snail she made for me) and tried out a lot, but today she's given it up almost completely, and the rest of my family doesn't do crafts at all. This leads to me getting all the requests for hand-crafted items, most of the time for birthday and Christmas presents. I don't mind since I love giving hand-crafted stuff as presents. But sometimes it gives me rather strange challenges ...

This was the case here, too. What do you think that is? No, it's not just for decoration. It's a garbage bag chicken.

A what?

A garbage bag chicken. Yes, really.

My mother had seen it in a shop and thought it was funny but thought: "I'm sure you can make that yourself." "You" means me, of course :). And so I got the order for a custom-made garbage bag chicken for her birthday and a link to a website with a picture for information.


Tja, da saß ich erst mal! Ein Huhn zu nähen ist ja erst die halbe Miete, irgendwie sollte es aber noch als Mülltüten-Spender fungieren. Es hat mich etwas Kopfzerbrechen gekostet, auszuknobeln, wo die Mülltüten hineinpassten und wie man sie dann wieder herausbekommen sollte. Am Ende nähte ich unten in den Bauch des Huhns eine in der Mitte geteilte Raute ein, die mit einem Kam Snap verschlossen wird, und darunter befindet sich eine Klopapierrolle, in die ich einen Schlitz geschnitten habe - darin kommen dann die Müllbeutel und werden durch den Schlitz herausgezogen.

Wie man auf dem obigen Bild sieht, hat das Huhn außerdem einen Klettverschluss an den Füßen, so dass man es umgekehrt zum Beispiel an einen Schubladengriff in der Küche hängen kann. Angesichts dessen fand ich es nur passend, dass es sich wohl um ein totes Huhn handelt, daher die Kreuzchenaugen. Makaber? Vielleicht ein bisschen ^^.

So, and there I was! Sewing the chicken itself is only half the story, after all, somehow it was also supposed to take garbage bags and hold them ready to use ... I had to wrack my brain quite a bit to find out how to do it so they were easy to put in and get out. In the end, I put a diamond-shaped piece into its belly which is split in half and kept close with a kam snap. Below it is a toilet paper roll into which I cut a slot - this holds the garbage bags which are pulled out through the slot.

As you can see from the above picture, the chicken has a velcro patch on its feet so you can hang it upside down from a drawer handle or the like. Therefore, I thought it was quite fitting that it's a dead chicken - that's why it has crosses for eyes. A bit morbid? Maybe ^^ ...


Ich bin recht stolz auf das Endergebnis, und meine Mama hat sich sehr gefreut :). Eigentlich wollte ich zwischendurch Fotos machen, damit ich vielleicht ein Tutorial für das Huhn schreiben kann, allerdings habe ich es nach einiger Zeit aus Zeitnot vergessen - wir haben den Geburtstag meiner Mutter am Sonntag gefeiert, und ich saß den ganzen Samstag davor an dem Huhn und dem Geschenk für meinen Bruder (der zwei Tage nach meiner Mutter Geburtstag hat und natürlich auch etwas Selbstgemachtes bekommen hat) *hust*. Vielleicht sollte ich noch einmal eins nähen und dabei Fotos machen, aber ehrlich gesagt würde ich es selber nicht verwenden, auch wenn ich die Idee sehr witzig finde.

Was haltet ihr denn von solchen "Gag"-Dekostücken, hinter denen sich auch ein Nutzen verbirgt?

I'm quite proud of how it turned out, and my mom was happy :). Originally I had planned to take pictures while making it so I could perhaps write a tutorial for it but after some time I forget because I was in a hurry - we celebrated my mom's birthday on Sunday, and I was working the whole Saturday on the chicken and the present for my brother (whose birthday is two days after my mother's and who got something self-made, too) *cough*. Perhaps I should make another one and take pictures, but to be quite frank, I wouldn't use it myself even if the idea is quite funny.

What do you think about such funny decoration also having a practical purpose?

Sonntag, 14. Juli 2013

[Stich an Stich] Sport-Handytasche


Erinnert ihr euch noch an diese Handytasche? Tja, ich muss ehrlich zugeben, dass ich auch Monate später noch ohne Handytasche herumlaufe ... Irgendwie stand immer anderes an, was irgendwie wichtiger war.

Aber immerhin habe ich mir eine Handytasche genäht, allerdings nicht für den Alltagsgebrauch, sondern für den Sport. Das Handy muss schließlich mit, wenn ich laufen gehe, und mir nachher erzählen, wie weit und wie schnell ich gelaufen bin. Aber es die ganze Zeit in der Hand tragen? Und am Ende fällt es noch herunter ... Nein, das ging gar nicht. Also ran an den Stoff!

Do you still remember this smartphone pouch? Well, I have to admit that even months later, I still didn't sew another pouch ... Somehow, something else was more important all the time.

However, I did sew a smartphone sleeve - not for daily use, though, but for running. After all, I need to take my smartphone along so that it can tell me later how fast I've been and what distance I've run. But holding it in my hand the whole time? And at the end I'll drop it ... No, that's really not possible. So off to the sewing machine I went!


So entstand dieses Täschchen - diesmal ist es auch groß genug, wie ihr seht :o). Es ist ganz einfach gehalten - nur zwei Schlaufen für den Arm mit Gummizug, keine Innen- oder Außentaschen, einfach nur Handy reinstecken, Klappe zu und fertig. Seit es genäht wurde, hat es sich auch schon fleißig bewährt - ehrlich gesagt entstand es nämlich schon vor ein paar Monaten. Ich bin nur nicht vorher zum Fotografieren und Bloggen gekommen ... (Bei Kuchen & Co. habe ich mehr Anreiz, sofort Fotos zu machen, wenn nicht, ist nämlich bald nix mehr zum Fotografieren da XD.)

The result is this litte pouch - as you can see, it's big enough this time! I kept it very simple - only two loops for the arm with some elastic, no inner or outer pockets, just put in the phone, close the flap and you're set. It has already proven its worth - to be honest, I made it a few months ago. I just didn't get around to taking pictures and blog about it before ... (I have more reason to take pictures immediately when it's about cake and so on - if I don't, there soon isn't anything left to take pictures of XD.)


Wenn ich mir noch einmal ein solches Täschchen nähen würde, würde ich vielleicht ein paar Sachen anders machen - zum Beispiel sind die Armschlaufen nicht ideal, und es ist etwas schwer, das Handy im angezogenen Zustand in die Tasche zu bekommen. Für die Fütterung habe ich ganz einfaches dünnes Volumenvlies genommen - da ich aber beim Laufen doch recht stark schwitze, würde ich beim nächsten Mal etwas Saugfähigeres nehmen, etwa ein Putztuch. Und eine kleine Seiten-, Innen- oder Außentasche wäre vielleicht doch praktisch, meine momentane Laufhose hat nämlich keine Tasche für Schlüssel und so weiter.

Also eigentlich würde ich beim nächsten Mal fast alles anders machen *lach*. Das ändert nichts daran, dass dieses Stück mir gute Dienste leistet und auch noch weiter leisten wird :).

Wie gefällt euch das Täschchen? Wenn ihr auch Sport macht, benutzt ihr dann auch so etwas?

If I made another pouch like this, I would perhaps do some things a bit different - for example, the loops for the arm are not ideal, and it's a bit difficult to get the phone into the pouch while wearing it. I used simple fusible fleece as lining but since I'm sweating a lot while running, I would use something more absorbative next time, like some cleaning cloth. And a small side or outer pocket would perhaps be a good idea, my current running pants don't have any pockets for my keys and similar.

So, actually I would do almost everything different the next time *laughs*. But that doesn't change the fact that this pouch has been doing a good job and will continue to do so.

How do you like this pouch? If you're also exercising, do you use something similar?

Sonntag, 16. Juni 2013

[Stich an Stich] Elfquest-Tasche


In meinem letzten Looking Back ...-Eintrag habe ich ja ein wenig von der Elfquest-Con erzählt, an der ich im Mai teilgenommen habe. Eine erst vor kurzem entstandene, aber sehr schöne Tradition auf dieser Con ist das "Wichteln" - jeder, der mag, bringt ein kleines Geschenk mit, das er den Organisatoren übergibt, und am Ende werden Nummern gezogen und somit die Geschenke unter den Teilnehmern verlost. Dabei ist es natürlich schön, wenn die Geschenke selber gemacht sind, und noch schöner, wenn sie etwas mit Elfquest zu tun haben. Ich finde das immer toll, weil da sehr viel Kreativität auf einem Haufen zusammenkommt! Diesmal gab es zum Beispiel Seifen, verzierte Holzkistchen, Beutel in mehreren Ausfertigungen und vieles mehr - ich selbst habe eine Nachbildung einer Kette bekommen, die ein Charakter im Comic trägt :).

Mein Beitrag dazu war dieser Einkaufsbeutel - ursprünglich dachte ich an eine eher handtaschenmäßige Tasche, aber beim Wichteln machen ja auch Männer mit, und Frauen, die keine Handtaschen mögen ;) ... Daher wurde es eben ein neutraler, aber dafür hoffentlich um so praktischerer Beutel.

In my last "Looking back ..." post, I already told you a bit about the Elfquest con I attended in May. A tradition on that con that only exists for a few years so far but that I really love is the "secret elfies" - everyone who wants to brings along a small present they give to the organisation team, and at the end of the con everyone who brought something draws a number and gets another present back. Of course it's particularly nice if the presents are handmade, and even nicer if they're Elfquest-themed. I absolutely love this because it's so great to see such a lot of creativity in one spot! For example, this time we got soap, decorated wooden boxes, various types of small bags and may more - I got a reproduction of a necklace one of the characters wears in the comic :).

I contributed this shopping tote - originally I thought of making a rather handbag-type bag but there are also men taking part, and women who don't like handbags ;) ... So it was this more neutral but hopefully all the more practical tote.


Die Welt, in der Elfquest spielt, wird auch die Welt der Zwei Monde genannt. Sie hat nämlich zwei Monde - da wärt ihr jetzt nie drauf gekommen, was ;)?. Also habe ich für die eine Seite diese zwei Monde als Motiv gewählt.

Eine Eigenart der Elfen in diesem Comic ist, dass sie sich telephathisch verständigen können, über das sogenannte "Senden". Illustriert wird das dann mit diesem Sendestern. Somit schmückt er bei mir die Rückseite.

Beide Motive, ebenso wie der Wald am unteren Rand sind appliziert, bei dem Sendestern habe ich dann noch mit andersfarbigem Garn die "Strahlen" aufgesteppt. Außerdem habe ich noch kleine Punkte als "Sterne" aufgenäht, um das Ganze mehr wie einen Nachthimmel aussehen zu lassen.

The world Elfquest is set in is also called the world of two moons. That is because it has two moons - you'd never guessed that, right ;)?So I chose these two moons as a motif for one side.

A pecularity of the elves in this comic is that they can communicate telepathically, through the so-called "sending". This is always illustrated with this sending star, so I put it on the backside of the tote.

Both motifs as well as the forest at the lower edge are appliques, and I added some topstitching with yarn in different colours for the "beams" of the sending star. I also sewed some little white spots as "stars" to make it look like a night-time sky.


Hier seht ihr übrigens mal mein Label, mit dem ich von mir genähte Stücke kennzeichne (wenn ich es nicht einzunähen vergesse *hust* ...). Dieses Label gab übrigens auch meinem Blog seinen Namen, da es die Labels schon eine ganze Weile länger gibt ^^ ...

Here you can also see my label I use to mark anything made by me (unless I forget to sew it in *cough* ...). This label gave my blog its name, by the way, since the labels have been around for a while longer ^^.


Ich hoffe, die neue Besitzerin mag ihre Tasche und hält sie in Ehren :). Eine Freundin war übrigens so begeistert davon, dass ich jetzt den Auftrag habe, ihr auch eine zu nähen. Jetzt müsste ich nur noch die Zeit dafür finden *seufz* ...

Wie gefallen euch so individuell gestaltete Taschen? Was für ein Motiv würdet ihr dafür wählen?

I hope the new owner likes her tote and treats it well :). A friend liked it so much that I now have the order to make one for her, too. Now I only need to find the time to do so *sigh* ...

How do you like such individually designed totes? What kind of motif would you like on a tote?

Sonntag, 12. Mai 2013

[Stich an Stich] Servietten


Nachdem in letzter Zeit echt viel gebacken wurde hier auf meinem Blog, ist es an der Zeit, euch auch mal wieder was Genähtes zu zeigen :).

Anfang des Jahres rief Laura, die auf dem wunderschönen Blog Tagträumerin bloggt, zu einer Leseraktion auf: Sie heiratet dieses Jahr, und da ihre Hochzeit möglichst "handgemacht" sein sollte, bat sie ihre Leser um Mithilfe. Wer wollte, konnte für sie Servietten nähen - die passende Anleitung dazu lieferte sie gleich mit.

Ich war begeistert von der Idee, aber leider hat meine Zeitplanung hinten und vorne nicht gepasst, und so verpasste ich den offiziellen Einsendeschluss Ende März. Nachdem Laura aber schrieb, dass ihr noch ein paar Servietten fehlten, bot ich an, doch noch auszuhelfen, und setzte mich am glücklicherweise noch unverplanten nächsten Wochenende gleich hin, um Servietten zu nähen. Entstanden sind dabei diese zwei Stücke.

After there was a lot of baking on my blog lately, it's time again to show you something I sewed :).

At the beginning of the year, Laura who is blogging on the lovely blog Tagträumerin called on her readers for help: she will marry her boyfriend this year, and since she wants to have her wedding as "handmade" as possible, she wanted her readers to be a part of it, too. So whoever wanted, could sew some napkins for her - she also provided a tutorial for it.

I loved the idea, but like every so often, my schedule did not work out at all, and so I missed the official submission date at the end of March. However, after Laura wrote that she was still missing some napkins, I offered to pitch in and sat down on the following weekend, which was luckily free, to sew some napkins. These two are the result.


Eine Hochzeit ganz ohne Herzen geht ja nicht, und darum bekam die erste Serviette eine Applikation aus zwei Herzen in Knallorange. Eigentlich hatte ich den orangefarbenen Punktestoff auch für die Servietten gekauft, fand ihn dann aber für eine ganze Serviette zu knallig. Aber als farbiger Akzent auf dem dezenten Hellbraun gefiel er mir gut.

Ich muss gestehen, das war meine erste Applikation, und leider sieht man es auch ein wenig - ein bisschen knittrig ist es schon geworden. Ich hoffe, Laura verzeiht mir diese kleinen Schönheitsfehler!

You can't have a wedding without hearts, I think, and so I appliqued two hearts in bright orange on the first napkin. Originally I had bought the orange polkadot fabric for the napkins, too, but found it too bright for a whole napkin after all. But it gives the restrained light brown a nice bit of pop!

I have to admit, this was my very first applique, and unfortunately it shows - it got a bit wrinkly ... I hope Laura doesn't mind such small flaws!


Als großer Patchwork-Fan wollte ich auch unbedingt eine Serviette mit zwei verschiedenen Stoffen machen - allerdings wollte ich auch nicht, dass auf der Rückseite offene Nähte zu sehen sind ... Also entschied ich mich schließlich dafür, dem schönen gelben Blümchenstoff einen grünen Rand mit Pflanzenmuster zu verpassen, so verschwanden nämlich die Nähte hinter dem Saum auf der Rückseite.

Eine Alternative, die vielleicht auch noch möglich gewesen wäre, da der gelbe Stoff sehr leicht war, wäre es gewesen, einen neutralen Stoff auf die Rückseite zu nähen, der die Nähte verdeckt. Nun ja, die Idee behalte ich im Hinterkopf, sollte ich mal wieder Stoffservietten oder ähnliches nähen.

Insgesamt hat es mir viel Spaß gemacht, die Servietten zu nähen - Lauras Anleitung war sehr gut, und auch wenn mich das viele Bügeln ziemlich genervt hat, ergab es sehr schöne Servietten mit sauberen Säumen. Und es war außerdem natürlich ein schönes Gefühl, etwas zu einem ganz besonderen Tag eines anderen Menschen beitragen zu können :)!

Und wie gefallen euch die beiden Stücke?

As a big patchwork fan, I also really wanted to do a napkin with two different fabrics - I didn't want to have any visible seams on the backside, though ... So I finally decided to give the pretty yellow flower fabric a green border with a plant pattern, so that the seams were covered by the binding on the backside.

Another alternative might have been covering the seams with a neutral fabric on the backside since the yellow fabric was very light. Oh well, I'll keep that idea in mind if I ever sew napkins or something similar again.

I really enjoyed sewing the napkins - Laura's tutorial was great, and even though I didn't enjoy all that pressing at all, it made for very nice napkins with clean edges. And of course, it was a great feeling to be able to make a contribution to a very special day of someone else :)!

How do you like the napkins?