Posts mit dem Label lecker bakery werden angezeigt. Alle Posts anzeigen

Donnerstag, 19. Juni 2014

Mohn-Sesam-Käsewürfel


Neulich habe ich mich mit Freunden zu einem Videoabend getroffen, da ein Freund, der inzwischen etwas weiter weg wohnt, endlich mal wieder in der Gegend war. Das musste natürlich ausgenutzt werden, und so versammelte sich fast der ganze Freundeskreis. Und zu einem Videoabend gehört natürlich auch was Leckeres zum Knabbern!

Nachdem eine andere Freundin schon einen Kuchen backen wollte, entschied ich mich für etwas Herzhaftes und griff mal wieder zur Lecker Bakery Nr. 2 - wie ihr wisst, mein Lieblingsheft von den Bakery-Ausgaben. Diesmal fiel meine Wahl auf die Knusperwürfel mit Mohn und Sesam. Sie wurden auch ungeheuer lecker und gingen bei dem Videoabend sehr schnell weg - ich glaube, wir hatten noch nicht mal mit dem Film angefangen, als die Schüssel schon leer war *hust*. Das einzig Dumme: Ich darf die tollen Dinger nur noch einmal backen, wenn M2 nicht da ist. Sie fand den Geruch des Gruyère, der sich in unserer ganzen Wohnung verteilte, nämlich nicht so toll ;) ... Aber eventuell lässt sich das auch ändern, indem man einen etwas milderen Käse nimmt. Mit einem Bergkäse könnte ich mir das Rezept auch gut vorstellen!

A while ago I met up with some friends for a movie night since a friend who's living farther away by now was back home again for a chance. Of course we had to use that opportunity, and so almost our whole group of friends came together. And for a movie night you need some tasty snacks, of course!

Since another friend had already volunteered to bake a cake, I decided to do something salty and again returned to the Lecker Bakery no. 2 - as you know by now, my favourite of the Bakery magazines. This time, I chose the cheese squares with poppy seeds and sesame seeds. They turned out fabulously tasty and were a hit with my friends - I think we hadn't even started the movie yet when the bowl was empty *cough* ... The only catch: I can only bake them again if M2 isn't around. She wasn't that keen on the smell of the gruyère hanging in our whole flat ;) ... But maybe that could be helped by choosing a slightly milder chese. I can imagine they would also taste good using some cave-ripened cheese!


Mohn-Sesam-Käsewürfel

Zutaten:

100 g Gruyère (Stück)
25 g Parmesan (Stück)
125 g Mehl
1/2 TL Backpulver
125 g kalte Butter
2-3 EL Mohn
2-3 EL Sesam
etwas Wasser

Gruyère und Parmesan fein reiben. Mehl und Backpulver in einer Schüssel mischen. Käse und Butter in Stücken zufügen. Erst mit den Knethaken des Rührgeräts, dann mit den Händen kurz zu einem glatten Teig verkneten. Zugedeckt etwa 30 Minuten kalt stellen.

Teig halbieren. Jede Hälfte auf etwas Mehl zuerst zu einer Rolle (etwa 35 cm Länge) und dann mit Hilfe eines Lineals zu einer quadratischen Stange formen. Mit etwas Wasser bepinseln und dann eine Stange im Mohn und die andere im Sesam wenden. Die Körner leicht andrücken und beide Stangen etwa 1 Stunde kalt stellen.

Backofen auf 200°C vorheizen. Zwei Backbleche mit Backpapier auslegen. Stangen in knapp 1 cm dicke Scheiben schneiden und auf den Blechen verteilen. Im heißen Ofen 8-10 Minuten backen. Käsewürfel samt Papier vom Blech ziehen, auskühlen lassen. Übrige Käsewürfel genauso backen.


Cheese squares with poppy and sesame seeds

Ingredients:

100 g Gruyère cheese (piece)
25 g parmesan (piece)
125 g flour
1/2 tsp baking powder
125 g cold butter
2-3 table spoons poppy seeds
2-3 table spoons sesame seeds
a bit of water

Grate the Gruyère and parmesan cheese very finely. In a bowl, mix flour and baking powder and add in the cheese and butter in chunks. Knead into a smooth dough using the kneading hook of your hand or stand mixer first, then your hands. Cover the bowl and chill in the fridge for about 30 minutes.

Divide the dough in half. Shape each half on a floured surface first into a roll (with a length of about 35 cm) and then into a square bar using a ruler. Brush with some water and roll one bar in the poppy seeds and the other in the sesame seed. Lightly press the seeds into the dough and chill the dough again for about 1 hour.

Preheat the oven to 200°C. Line two baking sheets with parchment paper. Cut the bars in disks wuth a thickness of 1 cm and place on the baking sheets. Bake the first one 8-10 minutes. Pull the parchment paper with the cheese squares from the baking sheet and let cool. Bake the second sheet the same way.


Habt ihr ein Lieblingsrezept für Knabberzeugs? Oder seid ihr mehr die Chips- und Süßigkeiten-Franktion?

Do you have a favourite recipe for snacks? Or do you prefer a bag of crisps and some candy?

Sonntag, 23. Februar 2014

Vegane Kirsch-Brownies


Vor kurzem war es wieder soweit - eine neue Ausgabe der Lecker Bakery ist erschienen! Nachdem mich ja die letzten zwei Ausgaben schon begeistert hatten, ließ ich es mir diesmal auch nicht nehmen, die Zeitschrift zu holen :). Das Heft ist wieder ungeheuer liebevoll gestaltet und wunderbar fotografiert, mit vielen Rezepten, die ich am liebsten jetzt sofort nachbacken würde. Zu schade, dass ich nicht jeden Tag backen kann! (Also, ich könnte schon, aber wer soll das alles essen? Da würden wir ja am Ende platzen *g* ...)

Den Artikel über veganes Backen fand ich sehr interessant, und da ich ohnehin gerade einer Freundin, die seit einiger Zeit vegan lebt, ein kleines Geschenk schicken wollte, nahm ich das zum Anlass, als erstes ein Rezept daraus auszuprobieren - die Kirsch-Brownies.

Was soll ich sagen? Brownies sind einfach immer ein Hit (auch bei der letzten Ausgabe waren die Brownies das Erste, was ich nachgebacken habe), und diese sind keine Ausnahme. Sie sind ungeheuer schokoladig und saftig - man sollte definitiv eine Serviette bereit haben, wenn man sie isst, danach hat man nämlich total verschmierte Finger! (Oder man ist gleich wohlerzogen und nimmt eine Kuchengabel. Ich bin halt einfach nicht wohlerzogen ...) Das Einzige, was ich zu bemängeln hätte, wäre die Portionsgröße - das Originalrezept, das unter anderem eine ganze Flasche Ahornsirup erfordert, klang in meinen Ohren viel zu riesig! Also habe ich es halbiert und bekam auch so zwei meiner größten Tupperdosen voll. Das nachfolgende Rezept ist für diese halbe Menge - solltet ihr eine Fußballmannschaft oder eine Großfamilie zu versorgen haben, könnt ihr es ja einfach wieder verdoppeln :).

A while ago it was that time again - the new Lecker Bakery was available! Since I absolutely loved the last two magazines, I had to have this one, too :). It's again a lovely issue, with a lot of sweet designs and gorgeous pictures, with many recipes I'd love to try out right away. Too bad I can't bake every day! (okay, I could do that but who should eat all that stuff? We'd end up bursting *g* ...)

I thought the feature about vegan baking was very interesting, and since I had planned to send a little present to a friend anyway who's been a vegan for a while now, I took that as an opportunity to try out one of these recipes first - the cherry brownies.

What can I say? Brownies are just fabulous (the brownies were the first I tried out in the last issue, too), and these are no exception. They are extremely chocolatey and moist - you should definitely have a napkin handy when you eat them because you will end up with chocolate all over your hands! (Or you could be a good girl and take a pastry fork. I'm just not a good girl ...) The only thing I didn't like so much was the portion size - the original recipe which, among others, calls for a whole bottle of maple syrup, sounded way too much in my ears! So I halved it and still filled two of my biggest Tupperware containers. The following recipe therefore is half of the original - if you need to feed a soccer team or your whole extended family, you can just double it again :).


Kirsch-Brownies vom Blech

Zutaten:
1/8 l neutrales Öl
1/2 Glas Kirschen (720 ml)
100 g Zartbitterschokolade
300 g Mehl
125 g Zucker
50 g Backkakao
1 Päckchen Vanillezucker
1 TL Natron
1 TL Backpulver
1/8 l Sojadrink
1/8 l Ahornsirup

Den Ofen auf 175°C vorheizen. Ein kleines tiefes Backblech (oder eine flache große Auflaufform o.ä., etwa halbe Backblechgröße) einölen. Die Kirschen in einem Sieb abtropfen lassen und dabei den Saft auffangen. Die Schokolade grob hacken. Mehl, Zucker, Kakao, Vanillezucker, Natron und Backpulver mischen. Sojadrink, Öl, Sirup und 100 ml Kirschsaft verrühren. Mit dem Handrührgerät unter die Mehlmischung rühren. Die Kirschen und die Schokolade unterheben.

Den Teig auf dem Backblech glatt streichen und ca. 30 Minuten backen (der Teig sollte noch etwas feucht sein). Herausnehmen und auskühlen lassen.

Die Brownies in Würfel schneiden und mit Kakao bestäuben. Man kann dazu laut der Lecker Bakery noch Schlagsahne/Schlagcreme servieren, muss man aber meiner Meinung nach nicht ;). Sie schmecken auch ohne alles Weitere herrlich!


Baking sheet cherry brownies

Ingredients:
1/8 l neutral oil
1/2 jar of cherries (720 ml)
100 g plain chocolate
300 g flour
125 g sugar
50 g baking cocoa
1 package of vanilla sugar
1 tea spoon baking soda
1 tea spoon Backpulver
1/8 l soy milk
1/8 l maple syrup

Preheat the oven to 175°C. Oil a small deep baking pan (or a shallow big casserole dish or similar, about the half size of a baking pan). Drain the cherries in a sieve, catching the juice. Chop the chocolate. Mix flour, sugar, cocoa, vanilla sugar, baking soda and baking powder. Mix soy milk, oil, maple syrup and 100 ml of the cherry juice. Stir into the flour mixture using a kitchen machine or hand mixer. Add the cherries and chocolate.

Spread the dough onto the baking pan and bake for approx. 30 minutes (the dough should still be slightly moist). Take the brownies out of the oven and let cool.

Cut the brownies into cubes and dust with cocoa. According to the Lecker Bakery, you can serve them with whipped cream/vegan whipped cream but I don't think that's a must ;). They're absolutely lovely on their own!


Wie die letzten Male sammelt Maria von Ich bin dann mal kurz in der Küche noch bis heute die nachgebackenen Rezepte. Ich bin schon sehr gespannt, was die Favoriten der anderen Blogger sein werden!

Hat euch die Lecker Bakery auch so gefallen wie mir? Und was wollt ihr daraus gern ausprobieren?

Like the last few times, Maria of Ich bin dann mal kurz in der Küche is collecting the recipes others have tried out until today. I'm very curious to see what the other bloggers liked best!

Did you like the Lecker Bakery as much as I did? What do you want to try out first?

Sonntag, 25. August 2013

[Let them eat cake] Post aus meiner Küche - Zusammen schmeckt es besser!


Ich bin wieder zurück aus dem Urlaub, mit vielen schönen Bildern und Erinnerungen (und etwas mehr Gewicht) im Gepäck - wunderbar war es, aber viel zu kurz! Der Alltag hatte mich auch gleich wieder im Griff ... Aber hilft ja alles nichts, so ist das Leben nun mal. Kommen wir lieber zu was Schönem :).

Kurz vor meinem Urlaub fand die zweite Runde von Post aus meiner Küche in diesem Jahr statt, und gleichzeitig auch die zweite, an der ich teil nahm. Diesmal stand sie unter dem Motto: "Zusammen schmeckt es besser!" Meine Tauschpartnerin war Dani von Fabulous Food. Und weil es nun mal zusammen besser schmeckt, hatten die Organisatorinnen diesmal die nette Idee, Tauschpartnerinnen aus der näheren Umgebung zu suchen, so dass man die Pakete persönlich übergeben und eventuell sogar zusammen genießen konnte. Daher machte ich mich an einem Sonntag ziemlich aufgeregt mit einem Päckchen unter dem Arm auf nach Stuttgart, wo ich mich mit Dani und ihrem Freund traf. Das Wetter verhinderte leider, dass wir uns in einen Park setzen konnten, aber auch in einem Café haben wir uns über zwei Stunden lang sehr gut unterhalten. Und sowohl Paket als auch Empfängerin schafften es anschließend trockenen Fußes nach Hause.

Das Thema hat mir etwas zu denken gegeben: Angefangen habe ich mit der Frage "Was teile ich gern mit anderen?" Dabei kam ich nicht weit, und als ich M2 davon erzählte, meinte sie auch nur: "Alles?" Tja, das war das Problem ... Also suchte ich nach einem neuen Ansatz und kam dann darauf, zu welchen Anlässen man gern teilt. Und schon hatte ich ein Konzept für mein Paket!

Und das war am Ende darin:
  • Apple Pie Pops - für vertrauliche Gespräche mit der besten Freundin
  • Rosmarin- und Thymian-Cracker und Tomaten-Feta-Dip - für lustige Abende im Freundeskreis
  • Erdbeerherzen - für traute Stunden zu zweit mit dem Liebsten
  • Zucchini-Kuchen - für den Nachmittagskaffee mit der Familie

I am back from vacation, bringing back lots of lovely pictures and memories (and a few pounds more) - it was wonderful but much too short! Everyday life is back with a vengance again, too ... But that's life. Let's talk about something nice instead :).

Shortly before I left for my vacation, the second round of Post aus meiner Küche (Mail from my kitchen) took place, which was also the second time I took part. The theme for this round was "Zusammen schmeckt es besser!" (Everything tastes better when you share it. My swap partner was Dani who writes the blog Fabulous Food. And since everything tastes better when you share it, the girls organising PAMK had the nice idea to look for swap partners that live nearby so that we could hand over the parcels personally and even enjoy them together. Therefore, I went to Stuttgart one Sunday, feeling rather excited and bearing a parcel with my home-made goods, to meet Dani and her boyfriend. Unfortunately, the weather was quite bad so we couldn't sit in a park but we also enjoyed spending over two hours in a café, talking and getting to know each other. And both the parcel and its recipient got home safely afterwards.

The theme made me think a lot. I started with the question: "What do I like to share with others?" I didn't get far with that, and when I told M2 about it, she only said: "Everything?" Well, that was the problem ... So I went looking for a different approach and decided to concentrate on when you like to share something with others. And so I found the concept for my parcel!

And this is what I packed into it in the end:
  • Apple Pie Pops - for confidential talks with your best friend
  • Rosemary and Thyme Crackers and Tomato Feta Dip - for enjoying the evening with your friends
  • Strawberry Hearts - for being with your love
  • Zucchini Sheet Cake - for coffee and cake with your family


Die Apple Pie Pops stammen aus der aktuellen Lecker Bakery 4 und haben mich dort gleich angelacht. Für ein Treffen mit der besten Freundin finde ich so etwas, was relativ unkompliziert ist, aber viel hermacht, echt ideal! Ich habe das Rezept im Wesentlichen beibehalten - was ich allerdings geändert habe, war die Art, den Deckel zu arbeiten. In der Lecker Bakery war vorgesehen, aus dem Deckel Formen auszustechen (nötig, damit sich die Pie Pops beim Backen nicht aufblähen). Das gelang mir nicht so recht so, dass es hübsch aussah, und so entschied ich mich, lieber ein Gitter zu arbeiten. Meine Lösung gefällt mir jetzt viel besser! Ansonsten ist das Rezept aber super, der knusprig-zimtige Mürbeteig ist klasse.

The apple pie pops are a recipe from the latest Lecker Bakery and caught my eye immediately. I thought that something that isn't much work but still has something special was perfect for meeting your best friend . Mostly, I followed the recipe closely - however, I changed the way of doing the "cover" of the pies. The Lecker Bakery suggested cutting some cute shapes from it (which is necessary to avoid the pies puffing up while baking). I didn't really manage to do that in an attractive way, and so I decided to go for a lattice pattern instead. I now like my solution much better! Other than that, the recipe is great, the crisp cinnamon crust is wonderful.


Die Rosmarin- und Thymian-Cracker sind noch aus der Lecker Bakery 3, ein Rezept, das ich länger schon ausprobieren wollte. Sie sind auch wirklich einfach und gehen sehr schnell - ich fand sie nur allein etwas trocken, weswegen spontan noch der Tomaten-Feta-Dip hinzu kam. Der ist übrigens noch einfacher und schneller und schmeckt auch als Brotaufstrich sehr gut. Perfekt zum Beispiel für einen Videoabend im Freundeskreis!

The rosemary and thyme cracker are from the Lecker Bakery 3, a recipe I had been itching to try for a while. They are very easy and quick to do - I only found them a bit dry on their own which is why I spontaneously decided to add the tomato feta dip. That one is even easier and quicker and tastes great on bread, too. Perfect for watching some movies with your friends, for example!


Für das Zusammensein mit dem Liebsten wollte ich gern etwas Romantisches - da war das Rezept für Erdbeerherzen, wieder aus der aktuellen Lecker Bakery 4, ideal! So ganz habe ich das mit der Herzform zwar nicht hingekriegt, vielleicht, weil ich es mit der Marmelade etwas zu gut gemeint habe, aber geschmeckt haben sie trotzdem sehr gut. Dank fertigem Blätterteig auch wieder ein recht einfaches, unkompliziertes Rezept!

For time spent with your love, I wanted to have something romantic - so the recipe for strawberry hearts, again from the Lecker Bakery 4, was perfect. I didn't really get the heart shape to work, perhaps because I used a bit too much jam, but they tasted great nevertheless. Since the puff pastry is store-bought, it's again a rather easy, uncomplicated recipe.


Und zuletzt gab es das Einzige, was mir zum Thema "Was teile ich gern" sofort eingefallen ist - dieser Kuchen ist in meiner Familie nämlich sehr beliebt, und ich werde oft gebeten, ihn mitzubringen, wenn wir uns treffen. Besonders meine Schwägerin isst ihn sehr gern - dann allerdings ohne Schokoüberzug, die Ärmste verträgt nämlich keine Schokolade. Das Rezept verdanke ich einer Kommilitonin - kennengelernt habe ich ihn übrigens in der ganz einfachen Version für Faule: keine Kuvertüre, sondern man stelle einfach ein Glas Nutella mit einem Messer neben den Kuchen ...

Wenn man ihn für Leute bäckt, die ihn noch nicht kennen, kann es übrigens empfehlenswert sein, die Hauptzutat zu verschweigen, da einige Leute sich durch den Gedanken an Gemüse im Kuchen abschrecken lassen ... Dabei schmeckt man die Zucchini gar nicht raus, sie macht ihn aber sehr saftig, so dass er sich auch ausgezeichnet ein paar Tage lang hält. Also echt super, wenn zum Beispiel die Familie zu Besuch kommt und man viel vorzubereiten hat!

And finally, there was the one thing I immediately thought of in answer to the question "What do I like to share" - this cake is very popular in my family, and they often ask me to bring it when we meet. My sister-in-law in particular loves it - without chocolate, though, since the poor girl can't have chocolate. I got the recipe from a fellow student at university - I got to know this cake in the very easy version for lazy people: no chocolate covering but just a jar of Nutella and a knife ...

If you bake it for someone who doesn't know it yet, it can be advisable not to tell them about the main ingredients since some people do not like the thought of vegetables in their cake ... You can't really taste the zucchini, though, but it makes the cake very moist so that it keeps very well for several days. So it's great if the family comes to visit and you have a lot of stuff to do!

Da ich mit meinem Eintrag über diese PAMK-Runde ziemlich spät dran bin (es ist schon fast einen Monat her!), habe ich mir überlegt, dass ich euch diesmal die Rezepte nicht nach und nach in mehreren Einträgen präsentieren will - auf einmal in einem Eintrag gäbe aber einen ungeheuer langen Eintrag. Also habe ich stattdessen ein PDF mit den Rezepten erstellt und biete es euch zum Download an. Es ist grafisch nicht besonders anspruchsvoll, aber ich hoffe, es gefällt euch trotzdem!


Since I'm rather late with my post about this PAMK round (it's been almost a month!), I decided that I don't want to show you the recipes bit by bit in several posts - but all of them in one post would make it incredibly long. So I made a PDF with the recipes instead that you can download. It's not very sophisticated from a graphic design point of view but I hope you like it nevertheless!


Von Dani bekam ich übrigens auch ein wunderbares Paket, mit Pizzaschnecken, Schinken-Zucchini-Muffins, Cookies und Zitronenmuffins. Leider wurde mein Foto davon etwas unscharf - wahrscheinlich war ich zu ungeduldig, endlich probieren zu dürfen. Egal, geschmeckt hat alles supergut :)!

Dani gave me a wonderful parcel herself, with pizza rolls, ham and zucchini muffins, cookies and lemon muffins. Unfortunately, the picture I took is a bit fuzzy - I guess I was too impatient to finally try it! But everything tasted wonderful :).


Mit den zwei Rezepten aus der Lecker Bakery 4 reihe ich mich heute auch gerade noch rechtzeitig noch einmal bei Maria von Ich bin dann mal kurz in der Küche ein, die hier die Rezepte aus der Lecker Bakery sammelt.

Wart ihr diesmal auch bei PAMK dabei? Und was sind so die Rezepte oder Gelegenheiten, die ihr gerne mit anderen teilt?


With the two recipes from the Lecker Bakery 4, I again join Maria of Ich bin dann mal kurz in der Küche who collects the recipes from the Lecker Bakery here, just in time.

Did you take part in PAMK this time? And which are the things or events you love to share with others?

Sonntag, 28. Juli 2013

[Let them eat cake] Brownies mit Honignüssen


Habt ihr schon von der neuen Lecker Bakery gehört? Vor drei Wochen ist sie erschienen, und zwar stand ich nicht morgens gleich beim Zeitschriftenhändler, aber am gleichen Tag haben musste ich sie doch :). Und am nächsten Tag wurde gleich etwas daraus gebacken! Eigentlich hatte ich zuerst mein Augenmerk auf den Johannisbeer-Pull-Apart-Cake geworfen, das scheiterte aber daran, dass es keine Johannisbeeren gab. Und so wurden es stattdessen saftig-schokoladige Brownies.

Was soll ich sagen? Brownies sind einfach immer ein Hit, und diese waren keine Ausnahme. Getoppt mit leckeren Honig-Haselnüssen und reichlich Schokolade, yum! Definitiv ein Rezept, das zum wiederholten Backen einlädt!

Did you hear about the new Lecker Bakery yet? It came out three weeks ago, and while I didn't stand in front of the newspaper kiosk in the morning, I still had to have it on the same day :). And the next day I made one of the recipes in it! Originally I had first wanted to do the red currant pull-apart cake, but that didn't happen because there were no red currants to be had. So instead, I made lucious chocolatey brownies.

What can I say? Brownies are always awesome, and these were no exception. Topped with tasty honey hazelnuts and lot of chocolate, yum! Definitely a recipe asking to be made again!


Brownies mit Honignüssen

Zutaten
250 g Butter
400 g Zartbitterkuvertüre
200 g Zucker
200 g gemahlene Haselnüsse
1 1/2 TL Backpulver
7 Eier
100 g Haselnüsse
2 EL flüssiger Honig

Eine quadratische oder runde Springform (24x24 cm oder 26 cm Durchmesser) einfetten. Den Backofen auf 175°C vorheizen.

300 g Kuvertüre hacken und mit der Butter im heißen Wasserbad schmelzen. Herausnehmen und den Zucker unterrühren. Gemahlene Haselnüsse und Backpulver mischen und unter die Kuvertüremasse mischen. Eier nacheinander unterrühren. Den Teig in die Form füllen und glatt streichen. Ca. 30 Minuten backen. Herausnehmen und auskühlen lassen.

Haselnusskerne grob hacken und in einer Pfanne ohne Fett rösten. Vom Herd nehmen und Honig untermischen. Die restliche Kuvertüre im Wasserbad schmelzen. Brownies aus der Form lösen und in Würfel schneiden. Die Honignüsse darauf verteilen und die Kuvertüre in Streifen darüber träufeln. Trocknen lassen, bis die Schokolade fest ist.


Brownies with honey nuts

Ingredients
250 g butter
400 g plain chocolate
200 g sugar
200 g ground hazelnuts
1 1/2 tea spoons baking powder
7 eggs
100 g hazelnuts
2  table spoons liquid honey

Grease a square or round Springform pan (24x24 cm or 26 cm in diameter). Preheat the oven to 175°C.

Chop 300 g of the chocolate and melt in a bain maire with the butter. Remove from the heat and stir in the sugar. Mix ground hazelnuts and baking powder and mix into the chocolate dough. Stir in the eggs one after the other. Pour the dough into the pan and smooth out. Bake approx. 30 minutes, remove from the oven and let cool.

Chop the hazelnuts roughly and roast in a pan without any fat. Remove from the heat and mix with the honey. Melt the remaining chocolate in the bain maire. Remove the brownies from the baking pan and cut into cubes. Spread the honey nuts on them and drizzle the chocolate over them. Let dry until the chocolate has hardened.


Übrigens sammelt Maria von Ich bin dann mal kurz in der Küche auch dieses Mal wieder die nachgebackenen Rezepte aus der Lecker Bakery, wie sie es auch schon beim letzten Mal getan hat - und diesmal hat sie sogar Preise von der Lecker-Redaktion bekommen! Wer mitmachen will, kann noch bis 25.8. Bilder und Blog-Links an Maria schicken. Mal sehen, ob ich bis dahin noch etwas nachbacke und poste :) ... (Den Johannisbeer-Pull-Apart-Cake gab es übrigens ein paar Tage später, der wurde aber aufgrund der Umstände nicht blogreif fotografiert.)

Und, habt ihr euch die Lecker Bakery auch geholt? Welche Rezepte machen euch besonders an?

By the way, Maria from Ich bin dann mal kurz in der Küche is collecting the recipes from the Lecker Bakery again like she did the last time - and this time, she even got some prizes from the Lecker staff! If you want to take part, you can send pictures and blog links to Maria until 25 August. We'll see if I manage to bake something else until then and blog about it :) ... (The red currant pull-apart cake I made a few days later, by the way, but due to ... stuff, it didn't make it on any pictures worth blogging.)

So, did you get the Lecker Bakery yet? Which recipes make your mouth water the most?

Sonntag, 23. Juni 2013

[Let them eat cake] Brioches mit Brombeerkonfitüre


Erinnert ihr euch noch an die Lecker Bakery 3, die vor einiger Zeit durch alle Blogs geisterte? Ja, ich weiß, das ist schon sehr lange her, und inzwischen sind alle schon bei der neuen Sweet Paul, Deli und wie sie alle heißen - aber ich brauch eben manchmal etwas länger.

Nein, im Ernst, es gibt einfach zu viele schöne Rezepte, als dass ich sie alle nachbacken könnte, aber die Lecker Bakery hole ich gern immer mal wieder hervor und stöbere darin. Vor einiger Zeit (*hust* siehe oben) war dann mal wieder ein Rezept daraus angesagt, für das Rollenspiel mit Freunden. Und weil ich Hefeteig einfach sehr gern mag, wurden es die Brioche mit Brombeerkonfitüre.

Gebacken habe ich sie übrigens in der Muffinform, da ich keine Briocheförmchen besitze (noch nicht?). Leider erwiesen sich die Muffinpapierförmchen, die ich dazu benutzte, als keine gute Wahl - sie hingen etwas mehr an den fertigen Brioche, als sie sollten ... Insofern würde ich euch raten, wenn ihr eine Muffinform benutzt, sie lieber vielleicht gut zu fetten oder Silikonförmchen zu benutzen - aber vielleicht hatte ich auch nur Pech mit meinen Förmchen, wer weiß? Hübsch sahen sie immerhin trotzdem aus, und dem Geschmack hat es keinen Abbruch getan - wie schon bei den Upside-Down-Buchteln ist der Hefeteig wunderbar locker und lecker, und die Kombination mit der Brombeer-Konfitüre (wobei sicher auch jede andere leckere Marmelade ginge) war wirklich klasse.

Do you remember the Lecker Bakery 3 which went through all the blogs a while ago? Yes, I know that was some time ago and is kinda an old hat now, with everyone moving on to the new Sweet Paul, Deli and what else there is - but sometimes I'm a bit slow.

No, seriously, there are way too many lovely recipes out there that I could bake them all, but I really like getting the Lecker Bakery out from time to time and leaf through it. Some time ago (*cough* see above) it was time for a recipe out of that magazine again, for a gaming session with friends. And since I really like a yeasty dough, I chose the brioche with blackberry jam.

I baked them in a muffin pan since I don't own any brioche pans (yet?). Unfortunately, the paper cups I used turned out to have been a bad choice - they were very clingy when we tried to remove them from the finished brioche ... Therefore I'd recommend if you use a muffin pan, better grease it well or use silicone baking cups - but maybe I was just unlucky with my paper cups, who knows? But they were pretty nevertheless, and the taste did not suffer - like with the upside-down buchteln, the yeast dough is lovely, very fluffy and tasty, and the combination with the blackberry jam was really great (though you could certainly use any other delicious jam, too).


Brioche mit Brombeerkonfitüre

Zutaten
200 ml Milch
1 Würfel Hefe
500 g Mehl
50 g Zucker
Salz
1 Ei
100 g weiche Butter
1 Eigelb
1 EL Milch
ca. 150 g Brombeerkonfitüre
etwas Puderzucker zum Bestäuben

Milch nur lauwarm erwärmen. Hefe hineinbröckeln und unter Rühren auflösen.
Mehl, Zucker, eine Prise Salz und Ei in eine (große!) Schüssel geben. Hefemilch zugießen. Mit den Knethaken des Rührgeräts unterrühren. Butter in Flöckchen unterkneten, bis der Teig geschmeidig ist. Formt er sich zur Kugel, ca. 3 Minuten weiterkneten.
Abgedeckt an einem warmen Ort ca. 40 Minuten gehen lassen.
Die Mulden einer Brioche-Backform oder einer Muffinform fetten. Hefeteig auf etwas Mehl kurz durchkneten. Aus ca. 2/3 des Teigs 12 gleich große Kugeln formen und in die Briocheform oder Muffinform setzen. Den restlichen Teig ebenfalls zu 12 kleineren Kugeln formen und auf einem Blech oder Teller zur Seite stellen. Alle Kugeln zugedeckt ca. 20 Minuten gehen lassen. Eigelb und Milch verquirlen.
Backofen auf 200°C vorheizen. In die Teigkugeln in der Form mit einem bemehlten Kochlöffelstiel ein Loch drücken und mit je ca. 1 TL Konfitüre füllen. Die kleinen Kugeln auf einer Seite mit etwas Eiermilch bestreichen. Mit der bestrichenen Seite auf die Konfitüre setzen.
Die Oberfläche der Brioche mit der Eiermilch bestreichen und in den Ofen schieben. Nach ca. 15 Minuten herausnehmen und abkühlen lassen. Mit Puderzucker bestäuben und warm oder kalt genießen, mit oder ohne etwas Butter dazu!


Brioche with blackberry jam

Ingredients
200 ml milk
1 cube of yeast
500 g flour
50 g sugar
salt
1 egg
100 g soft butter
1 egg yolk
1 tablespoon milk
approx. 150 g blackberry jam
some powdered sugar for dusting

Warm the milk until it's only lukewarm. Crumble the yeast into it and stir until dissolved.
Put flour, sugar, a pinch of salt and the egg in a (big!) bowl. Pour in the yeast milk. Mix with the dough hook of your hand mixer. Knead in the butter in small pieces until the dough is smooth. When it's forming into a ball, knead for another 2 minutes.
Leave to rest in a warm place for about 40 minutes, covered by a tea towel.
Grease the moulds of a brioche pan or muffin pan. Knead the dough a bit on some flour. Using about 2/3 of the dough, shape 12 balls of roughly the same size and place in the brioche or muffin pan. With the rest of the dough, shape another 12 smaller balls and place on a baking sheet or plate. Cover with a tea towel and let rest another 20 minutes. Whisk together the egg yolk and milk.
Preheat the oven to 200°C. Make a hole in the dough balls with the floured end of a wooden spoon and fill with approx. 1 teaspoon jam each. Brush the smaller balls on one side with some egg milk and put on the jam with the brushed side down.
Brush the surface of the brioches with the egg milk and put in the oven. Bake for approx. 15 minutes, then take them out and let them rest a bit. Dust with powdered sugar and enjoy warm or cold, with some butter or plain!


Bezugsquellen/sources:
Muffinförmchen/muffin paper cups: Blueboxtree
Servietten/napkins: Rossmann
Teller/plate: IKEA

Sonntag, 10. März 2013

[Let them eat cake] Upside-Down-Buchteln


Letzte Woche habe ich mir noch einmal was aus der Lecker Bakery ausgesucht - wir hatten noch einen Hefewürfel, der verbraucht werden musste. Unsere Wahl fiel auf die Upside-Down-Buchteln.

Und da ich mich am Wochenende mit meinen Eltern getroffen habe und ihnen ein paar davon mitbringen wollte, habe ich eine Tüte aus braunem Packpapier gebastelt und sie mit Washi-Tape verziert. Sie wurde ganz süß, und so habe ich sie gleich als Prop für den Foto-Shoot benutzt ;).

Die Buchteln sind sehr lecker - am besten sind sie natürlich, wenn sie frisch aus dem Backofen kommen! Und auch wenn ihre Herstellung für mich eine kleine Katastrophe nach der anderen darstellte (was nicht am tollen Rezept lag, sondern nur an meiner Schusseligkeit!), sind sie mir doch gut gelungen. Die Herstellung des Hefeteigs nach der Lecker-Anleitung war für mich etwas ungewohnt, er ist aber wirklich gut geworden.

Last week I tried another recipe from the Lecker Bakery - we still had a cube of yeast we needed to use, so we decided on the upside-down buchteln. Buchteln are an Austrian pastry, a kind of baked yeast bun usually eaten with custard or jam. Here, they are baked with a glaze of caramellised nuts.

And since I met my parents last weekend and wanted to bring them some of them, I made a bag from kraft paper and decorated it with washi tape. It turned out quite cute, and so I used it as a prop for the photo shoot ;).

The buchteln are very good - of course they are best just after baking! And even though I had one little catastrophe after the other when making them (which was not the fault of the great recipe but only my own ditziness!) they turned out great. Making the yeast dough according to the Lecker instructions was a bit unusual for me but it turned out really good. 


Upside-Down-Buchteln

Zutaten
200 ml Milch
1 Würfel Hefe
500 g Mehl
50 g Zucker
Salz
1 Ei
50 g weiche Butter
100 g Nüsse (z.B. Haselnüsse und Walnüsse)
150 g Zucker
100 g Schlagsahne
50 g Butter

Milch nur lauwarm erwärmen. Hefe hineinbröckeln und unter Rühren auflösen.
Mehl, Zucker, eine Prise Salz und Ei in eine (große!) Schüssel geben. Hefemilch zugießen. Mit den Knethaken des Rührgeräts unterrühren. Butter in Flöckchen unterkneten, bis der Teig geschmeidig ist. Formt er sich zur Kugel, ca. 3 Minuten weiterkneten.
Abgedeckt an einem warmen Ort ca. 40 Minuten gehen lassen.
Haselnüsse und Walnüsse grob hacken. In einer Tarte-Tatin-Form oder Pfanne ohne Fett rösten und herausnehmen. 150 g Zucker und 2 EL Wasser in der Form hell karamellisieren. Mit Sahne ablöschen, 50 g Butter unterrühren. Köcheln lassen, bis der Zucker vollständig gelöst ist. Nüsse unterrühren. Ohne Tarte-Tatin-Form das Karamell in eine Springform oder große, flache Auflaufform füllen.
Teig auf einer bemehlten Arbeitsfläche kurz durchkneten. Zu einer Rolle (5-6 cm Durchmesser) formen. In ca. 15 gleich große Stücke teilen, je zu einer Kugel formen. Dicht an dicht auf die Karamellnüsse setzen. Zugedeckt ca. 30 Minuten gehen lassen.
Backofen auf 200°C vorheizen. Buchteln ca. 20 Minuten backen. Erst ca. 15 Minuten in der Form abkühlen lassen und dann auf eine Platte stürzen. Restlichen Karamell aus der Form auf die Buchteln geben.


Upside-Down-Buchteln (sweet yeast dumplings)

Ingredients
200 ml milk
1 cube of yeast
500 g flour
50 g sugar
salt
1 egg
50 g soft butter
100 g nuts (e.g. hazel nuts and walnuts)
150 g sugar
100 g cream
50 g butter

Warm the milk until it's only lukewarm. Crumble the yeast into it and stir until dissolved.
Put flour, sugar, a pinch of salt and the egg in a (big!) bowl. Pour in the yeast milk. Mix with the dough hook of your hand mixer. Knead in the butter in small pieces until the dough is smooth. When it's forming into a ball, knead for another 2 minutes.
Leave to rest in a warm place for about 40 minutes, covered by a tea towel.
Chop the nuts roughly. Roast without fat in a tarte tatin or pan and remove. Lightly caramelize 150 g sugar and 2 table spoons of water. Deglaze with the cream and mix in the 50 g butter. Let boil lightly until the sugar has dissolved completely. Stir in the nuts. If you don't have a tarte tatin, fill the caramel into a springform pan or big flat casserole.
Knead the dough a bit on a floured surface. Shape into a roll (with a diameter of 5-6 cm). Divide into approx. 15 pieces of the same size and form into balls. Put on the caramel nuts close together. Let rest for about 30 minutes, covered by a tea towel.
Heat the oven to 200°C. Bake the buchteln for about 20 minutes. Leave to cool in the form for about 15 minutes first, then turn out on a plate. If there is caramel left in the form, pour it on top.

Dienstag, 19. Februar 2013

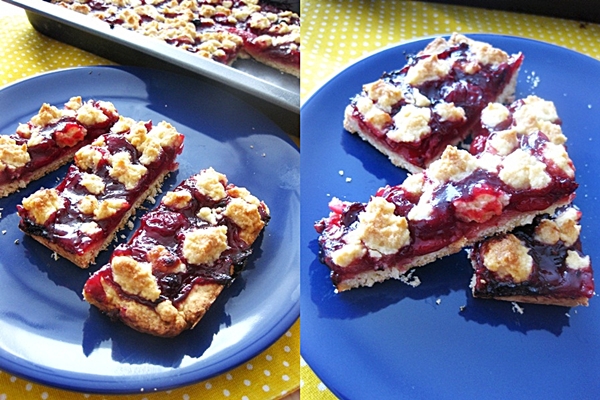
[Let them eat cake] Red Berry Crumble Bars

Kennt ihr schon die Lecker Bakery? Das ist vermutlich für alle im deutschen Raum, die gern backen, eine echt überflüssige Frage ... Nachdem ich einige Berichte darüber im Netz erspähen konnte (da bin ich öfter als im Zeitschriftenladen), musste ich sie mir auch unbedingt holen und habe vermutlich schon beim Durchblättern fünf Kilo zugenommen. Und so war es keine Frage, dass beim nächsten Rollenspiel etwas aus der Lecker Bakery serviert werden sollte!

Meine Wahl fiel dabei auf die Berry Crumble Bars. Beeren gehen immer, Crumble auch, was will man also mehr?

Do you already know the "Lecker Bakery"? Well, if you're not living in the German-speaking world, probably not, but let me tell you you're seriously missing out ;). After seeing a few reports about it on various blogs (which I visit more often than the newspaper stand) I had to go and get it and probably gained ten pounds just from reading it. And so I had to bake something from it for the next roleplaying day!

I chose the Berry Crumble Bars because really, I never object to berries or crumble, so they're a great combination for me!


Ich hoffe, ihr verzeiht mir die nicht so gelungenen Fotos - das kommt davon, wenn man schnell-schnell Fotos macht, damit danach noch eine Runde Joggen bei Tageslicht drin ist ...

Von der Zubereitung her war der Kuchen super, man sollte nur beim Kneten aufpassen, wirklich nur kurz zu kneten. Bei mir war es etwas zu lang, weswegen der Teig nicht mehr recht krümeln wollte und es mehr ein Zupfkuchen wurde. Ging aber auch. Man kann das Ganze auch bestimmt als normalen Blechkuchen servieren, aber diese Riegel haben natürlich den Vorteil, dass das so kleine Stückchen sind - die sind schnell weg, und noch eins geht immer!

I hope you forgive me the pictures which are not really good - that's what happens if you just snap a picture real quick since you want to go running in the daylight, too ...

The recipe is easy to make, you only need to be careful to not overknead the dough. I did that and as a result, the dough did not really want to crumble any more, so I had to tear off small pieces instead. That worked, too, though. You can always serve it as a tray-bake, too, but the bars have the advantage that they are such small pieces, of course - they're quickly gone, and there's always room for one more!

Und hier kommt das Rezept:

Red Berry Crumble Bars

Zutaten
350g kalte Butter (+ etwas für die Form)
500g Mehl (+ etwas für die Form)
175g Zucker
einige Tropfen Vanillearoma (Fläschchen)
500g rote Grütze (Becher)

Eine quadratische Springform (24x24 cm; ersatzweise rund, 26 cm) einfetten und mit Mehl ausstäuben. Backofen vorheizen (175°C). Mehl und Zucker in einer Schüssel mischen. Vanillearoma und Butter in Stückchen hinzufügen. Erst mit den  Knethaken des Rührgeräts, dann mit den Händen kurz zu Streuseln verkneten. Knapp 3/4 der Streusel in die Form geben und zu einem Boden andrücken.

Rote Grütze glatt rühren. Auf dem Streuselboden verteilen, dabei einen ca. 1/2 cm breiten Rand freilassen. Rest Streusel auf der Grütze verteilen. Im Ofen auf der zweiten Schiene von unten ca. 45 Minuten backen. Herausnehmen und in der Form auskühlen lassen. Kuchen mit einem Messer vom Rand lösen und halbieren, Jede Hälfte quer in ca. 15 Streifen schneiden.


Red Berry Crumble Bars

Ingredients
350g cold butter (+ a bit for the cake pan)
500g flour (+ a bit for the cake pan)
175g sugar
a few drops of vanilla flavouring
500g red fruit jelly

Butter a square springform cake pan (24x24 cm or round, 26 cm) and dust with flour. Heat the oven (175°C). Mix flour and sugar in a bowl. Add vanilla flavouring and butter in small pieces. Knead first with the dough hook of your hand mixer, then with the hands for a short time. Fill just about 3/4 of the crumbles into the pan and press to make a crust.

Stir the red fruit jelly until it's smooth. Distribute on the crust, leaving an edge of approx 1/2 cm. Distribute the remaining crumbles on the fruit jelly. Bake on the second to last rack for about 45 minutes. Take out and leave to cool in the pan. Use a knife to loosen the pie at the edge and cut in half. Cut every half in approx. 15 strips.